Table of Contents
Building Photon is super easy since the renderer is mostly coded from scratch using standard C++. Each of the required third-party libraries is either header only or pre-compiled, and can be handled automatically with the setup script.
Prerequisites
Photon uses CMake as its main build system, and the toolkits you need are as follows:
- CMake >= 3.20 (>= 3.28 recommended)
- Python 3 (>= 3.12 recommended)
- C++23 compliant compiler (necessary)
- MSVC >= 17.10.1
- GCC >= 14.0.1
If you want to build the editor in previous version, you will also need:
- JDK 1.8+ and Maven
This is not required for building the new C++ based editor. To run the editor, you will need to have a graphics driver that supports OpenGL (>= 4.6 on Windows, >= 4.5 otherwise).
Note that the working directory is assumed to be the project root (in the folder that you cloned) if not stated, and please use ./build/ as build folder for now since build scripts are more or less hard-coded to use this path, currently.
Step 1: Run the Setup Script
Run the setup script (depending on your system, choose either ./setup.bat or ./setup.sh), this will download pre-compiled libraries and resources into "./build".
Step 2: Compile
For Windows, just use CMake-GUI to generate project files for your favorite IDE.
For Linux and macOS, run the following commands:
cd ./build/cmake -DCMAKE_BUILD_TYPE=Release ../make
You can use a compiler of your choice by setting CC (for C compiler) and CXX (for C++ compiler) environment variables. For example:
export CC=gcc-15export CXX=g++-15
- Remarks
CCandCXXcan also take a path to the compiler executable.
Step 3: Have Fun
The compiled binaries will be in the ./build/bin/ folder.
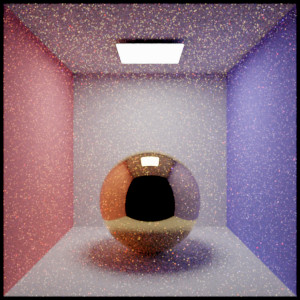
Try running PhotonCLI with the following command in the build directory to render our hello-world scene:
It will produce an image file named ./rendered_scene.png after some time, which should look like this:
Happy rendering 😄!
Appendix A: Available CMake Options
Several options are available for fine-tuning the built binaries. To specify a CMake option named SOME_OPTION with value SOME_VALUE, you should add it as an additional argument in the form
and substitute SOME_OPTION and SOME_VALUE with the options listed below.
*(do not forget the -D prefix)*
| Options | Values | Effects |
|---|---|---|
CMAKE_BUILD_TYPE | Release, Debug (default) | When set to Release, builds binaries with optimizations enabled; otherwise, no optimization is done (same as Debug). |
PH_BUILD_TESTS | ON, OFF (default: ON) | Build unit tests. They should be executed from the build folder. |
PH_BUILD_EDITOR_JNI | ON, OFF (default: OFF) | Build JNI for Photon Studio (previous editor). |
PH_BUILD_EDITOR | ON, OFF (default: ON) | Build editor application. |
PH_BUILD_SDL_GEN | ON, OFF (default: ON) | Build SDL automation tool. |
PH_BUILD_PHOTON_CLI | ON, OFF (default: ON) | Build command-line application. |
PH_BUILD_OPTIONAL_TOOLS | ON, OFF (default: OFF) | Build additional tools for the renderer. |
PH_ENABLE_DEBUG | ON, OFF (default: ON) | Enable debug functionalities (this is not a code optimization flag). |
PH_ENABLE_PROFILING | ON, OFF (default: OFF) | Enable profiling functionalities. |
PH_DOUBLE_PRECISION_REAL | ON, OFF (default: OFF) | Use double precision type for real numbers. |
PH_USE_FAST_MATH | ON, OFF (default: OFF) | More room for optimizations. This may not preserve strict IEEE compliance. |
PH_USE_SIMD | ON, OFF (default: ON) | Use vector instruction set found on the target hardware to accelerate computing. |
- Remarks
- You can also obtain a complete list of options with descriptions by running
cmake -LAH ../in the build folder.
Appendix B: Building Documentation
Similar to building the libraries, running setup script is also required (depending on your system, choose either ./setup.bat or ./setup.sh). After that, you can either choose to run Doxygen from the same directory as the doxygen.config file of each project, or run python ./scripts/build_doxygen_doc.py <path-to-doxygen-executable>. The output will be in ./Main/docs/.
Currently we are building documentation using Doxygen 1.11.0. You will also need the bibtex tool to be present in the search path to generate project bibliography.
- Warning
- As noted by the Doxygen documentation for output customization,
./Main/header.htmlmay need to be regenerated and updated after upgrading/changing the Doxygen version.